Как добавить новую сетевухе к уже работающему XenServer'у. Оказывается очень просто.
Заходим в консоль и:
(сначала надо посмотреть, что есть)
[root@xenAserver ~]# xe pif-list
uuid ( RO): ad516f57-46dc-7f09-2782-0cecf0e730b7
device ( RO): eth0
currently-attached ( RO): true
VLAN ( RO): -1
network-uuid ( RO): c641581f-c131-02aa-75db-1908bc3450a3
(новой сетевухи нет)
(запускаем сканирование физических интерфейсов)
[root@xenAserver ~]# xe pif-scan host-uuid=c8f6ac76-2e95-473b-9a7c-1a9f902550f4
(смотрим что получилось)
[root@xenAserver ~]# xe pif-list
(вот оно)
uuid ( RO): 9fc806fd-863a-d809-01c0-b65587c0cdee
device ( RO): dev6971662
currently-attached ( RO): false
VLAN ( RO): -1
network-uuid ( RO): d293e6a8-7870-0a53-8e9c-a6e09f0c62ac
uuid ( RO): ad516f57-46dc-7f09-2782-0cecf0e730b7
device ( RO): eth0
currently-attached ( RO): true
VLAN ( RO): -1
network-uuid ( RO): c641581f-c131-02aa-75db-1908bc3450a3
[root@xenAserver ~]# ifconfig -a
(и тут есть)
dev6971662 Link encap:Ethernet HWaddr 00:E0:52:95:60:C1
BROADCAST MULTICAST MTU:1500 Metric:1
RX packets:0 errors:0 dropped:0 overruns:0 frame:0
TX packets:0 errors:0 dropped:0 overruns:0 carrier:0
collisions:0 txqueuelen:1000
RX bytes:0 (0.0 b) TX bytes:0 (0.0 b)
Interrupt:16
eth0 Link encap:Ethernet HWaddr 00:16:17:B8:71:0F
UP BROADCAST RUNNING MULTICAST MTU:1500 Metric:1
RX packets:14582 errors:0 dropped:0 overruns:0 frame:0
TX packets:15319 errors:0 dropped:0 overruns:0 carrier:0
collisions:0 txqueuelen:1000
RX bytes:1337774 (1.2 MiB) TX bytes:16531960 (15.7 MiB)
Interrupt:21 Base address:0x4000
lo Link encap:Local Loopback
inet addr:127.0.0.1 Mask:255.0.0.0
UP LOOPBACK RUNNING MTU:16436 Metric:1
RX packets:11383 errors:0 dropped:0 overruns:0 frame:0
TX packets:11383 errors:0 dropped:0 overruns:0 carrier:0
collisions:0 txqueuelen:0
RX bytes:27038371 (25.7 MiB) TX bytes:27038371 (25.7 MiB)
tap1.0 Link encap:Ethernet HWaddr FE:FF:FF:FF:FF:FF
UP BROADCAST RUNNING NOARP MTU:1500 Metric:1
RX packets:4 errors:0 dropped:0 overruns:0 frame:0
TX packets:5452 errors:0 dropped:0 overruns:0 carrier:0
collisions:0 txqueuelen:500
RX bytes:408 (408.0 b) TX bytes:403423 (393.9 KiB)
vif1.0 Link encap:Ethernet HWaddr FE:FF:FF:FF:FF:FF
UP BROADCAST RUNNING NOARP MTU:1500 Metric:1
RX packets:0 errors:0 dropped:0 overruns:0 frame:0
TX packets:0 errors:0 dropped:5458 overruns:0 carrier:0
collisions:0 txqueuelen:32
RX bytes:0 (0.0 b) TX bytes:0 (0.0 b)
xenbr0 Link encap:Ethernet HWaddr 00:16:17:B8:71:0F
inet addr:192.168.0.97 Bcast:192.168.0.127 Mask:255.255.255.128
UP BROADCAST RUNNING MULTICAST MTU:1500 Metric:1
RX packets:13688 errors:0 dropped:0 overruns:0 frame:0
TX packets:15315 errors:0 dropped:0 overruns:0 carrier:0
collisions:0 txqueuelen:0
RX bytes:1088898 (1.0 MiB) TX bytes:16531552 (15.7 MiB)
(запоминаем мак, что бы скопировать его в следующую команду)
[root@xenAserver ~]# xe pif-introduce host-uuid=c8f6ac76-2e95-473b-9a7c-1a9f902550f4 device=eth1 mac=00:E0:52:95:60:C1
9fc806fd-863a-d809-01c0-b65587c0cdee
[root@xenAserver ~]#
brdev6971662 Link encap:Ethernet HWaddr 00:E0:52:95:60:C1
UP BROADCAST RUNNING MULTICAST MTU:1500 Metric:1
RX packets:4 errors:0 dropped:0 overruns:0 frame:0
TX packets:0 errors:0 dropped:0 overruns:0 carrier:0
collisions:0 txqueuelen:0
RX bytes:352 (352.0 b) TX bytes:0 (0.0 b)
dev6971662 Link encap:Ethernet HWaddr 00:E0:52:95:60:C1
UP BROADCAST MULTICAST MTU:1500 Metric:1
RX packets:0 errors:0 dropped:0 overruns:0 frame:0
TX packets:0 errors:0 dropped:0 overruns:0 carrier:0
collisions:0 txqueuelen:1000
RX bytes:0 (0.0 b) TX bytes:0 (0.0 b)
Interrupt:16
eth0 Link encap:Ethernet HWaddr 00:16:17:B8:71:0F
UP BROADCAST RUNNING MULTICAST MTU:1500 Metric:1
RX packets:54806 errors:0 dropped:0 overruns:0 frame:0
TX packets:84667 errors:0 dropped:0 overruns:0 carrier:0
collisions:0 txqueuelen:1000
все!
Проверено и сделано по мотивам форума Citirx
понедельник, 20 декабря 2010 г.
четверг, 18 ноября 2010 г.
Device for Super Engineer
Наткнулся в Reader'е на такую статью Ремень на все случаи жизни, как по мне так супер штучка, я бы хотел иметь в своём арсенате такую:

четверг, 11 ноября 2010 г.
XenDesktop design for Windows 7
Вчера натолкнулся на статью Be Realistic with Your Windows 7 Specifications , по-моему очень познавательно!
Как раз сейчас экспериментирую с этой штучкой.
Как раз сейчас экспериментирую с этой штучкой.
среда, 7 июля 2010 г.
nfdump & nfsen
В последней версии моей любимой Vyatta (6.0) появилась возможность собирать netflow.
И ради интереса решил испробовать как это всё будет.
В Vyatta все просто:
Сервачок мой для опытов на котором развёрнут Zabbix (192.168.ччч.ччч),был улучшен связкой nfdump с nfsen. Первое без второго работает, но второе без первого нет.
nfdump - это коллектор netflow, прекрасно работает сам но только операции все через командную строку надо выполнять. Но раз есть такая штука как nfsen решил их слепить.
nfsen - проще описать как GUI к nfdump с возможностью запуска последнего из своего *.conf файла. На просторах Internet'а очень много ресурсов где описано как это делать, но к моему сожалению ни один до конца мне не помог.
С nfdump нет проблем он ставиться из репозитария.
 До этого момента во всех блогах одно и тоже (ну или примерно одно и тоже)
дальше интереснее.
У меня начались сразу проблемы ))
RRDtool у меня был 1.4, с которым nfsen 1.3.3 не работает. Идём
libexec/NfSenRRD.pm и правим строку
Далее из переписки следовало, что надо заменить в install.pl все
У кого все в порядке, а у кого нет, потому что у некоторых стоит php5.2, а у некоторых
5.3. Для последних к коим я отношусь так же надо поколдовать дальше.
В папке web лица - /var/www/nfsen есть файлик nfsenutil.php.
В нём меняем
И теперь все должно получиться. Смотрим и радуемся.
И ради интереса решил испробовать как это всё будет.
В Vyatta все просто:
flow-accounting {
interface eth0
interface eth1
interface eth2
netflow {
server 192.168.ччч.ччч {
port 9997
}
timeout {
expiry-interval 600
max-active-life 172800
Последнии три строки можно не писать.Сервачок мой для опытов на котором развёрнут Zabbix (192.168.ччч.ччч),был улучшен связкой nfdump с nfsen. Первое без второго работает, но второе без первого нет.
nfdump - это коллектор netflow, прекрасно работает сам но только операции все через командную строку надо выполнять. Но раз есть такая штука как nfsen решил их слепить.
nfsen - проще описать как GUI к nfdump с возможностью запуска последнего из своего *.conf файла. На просторах Internet'а очень много ресурсов где описано как это делать, но к моему сожалению ни один до конца мне не помог.
С nfdump нет проблем он ставиться из репозитария.
sudo apt-get install nfdump
Так как на серваке у меня стоит Zabbix, то apache мне савить не надо но на всякий пож:sudo apt-get install apache2 libapache2-mod-php5 php5-common libmailtools-perl rrdtool librrds-perl
Дальше качаем сам nfsen:
cd /home/xxx/distr/
wget http://sourceforge.net/projects/nfsen/files/stable/nfsen-1.3.3/nfsen-1.3.3.tar.gz/download
gzip -dc nfsen-1.3.2.tar.gz | tar -xf -
cd nfsen-1.3.3
Создаем папку возможно в более привычном месте:sudo mkdir /etc/nfsen/
Копируем туда conf файл и редактируем:cp etc/nfsen-dist.conf /etc/nfsen/nfsen.conf
sudo vi /etc/nfsen.conf
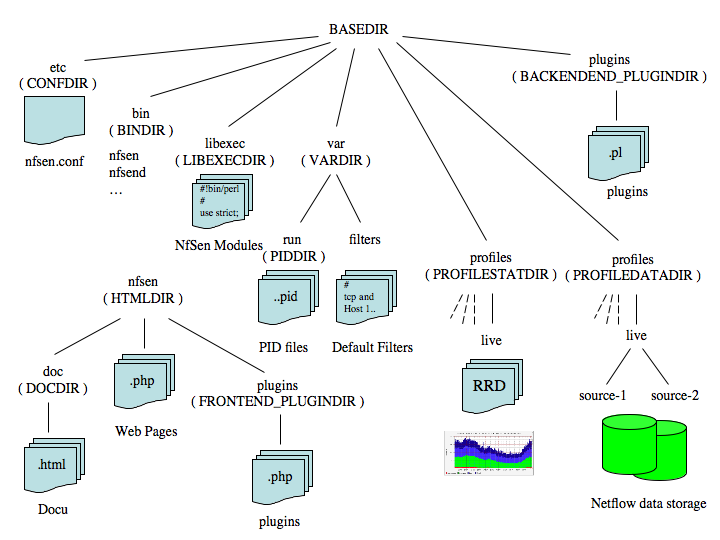
Там правим примерно вот что:# NfSen default layout:
# Any scripts, modules or profiles are installed by default under $BASEDIR.
# However, you may change any of these settings to fit your requested layout.
#
# Required for default layout
$BASEDIR = "/usr/local/nfsen";
#
# Where to install the NfSen binaries
$BINDIR="${BASEDIR}/bin";
#
# Where to install the NfSen Perl modules
$LIBEXECDIR="${BASEDIR}/libexec";
#
# Where to install the config files
$CONFDIR="/etc/nfsen/";
#
# NfSen html pages directory:
# All php scripts will be installed here.
# URL: Entry point for nfsen: http:///nfsen/nfsen.php
$HTMLDIR = "/var/www/nfsen/";
#
# Where to install the docs
$DOCDIR="${HTMLDIR}/doc";
#
# Var space for NfSen
$VARDIR="/var/local/nfsen";
# directory for all pid files
# $PIDDIR="$VARDIR/run";
#
# Filter directory
# FILTERDIR="${VARDIR}/filters";
#
# FORMATDIR for custom printing formats
# FORMATDIR="${VARDIR}/fmt";
#
#
# The Profiles stat directory, where all profile information
# RRD DBs and png pictures of the profile are stored
$PROFILESTATDIR="${VARDIR}/profiles-stat";
#
# The Profiles directory, where all netflow data is stored
$PROFILEDATADIR="/var/local/nfdump";
#
# Where go all the backend plugins
$BACKEND_PLUGINDIR="${BASEDIR}/plugins";
#
# Where go all the frontend plugins
$FRONTEND_PLUGINDIR="${HTMLDIR}/plugins";
#
# nfdump tools path
$PREFIX = "/usr/bin";
#
# nfsend communication socket
# $COMMSOCKET = "$PIDDIR/nfsen.comm";
# BASEDIR unrelated vars:
#
# Run nfcapd as this user
# This may be a different or the same uid than your web server.
# Note: This user must be in group $WWWGROUP, otherwise nfcapd
# is not able to write data files!
$USER = "www-data";
# user and group of the web server process
# All netflow processing will be done with this user
$WWWUSER = "www-data";
$WWWGROUP = "www-data"; # Receive buffer size for nfcapd - see man page nfcapd(1)
$BUFFLEN = 200000;
# list of extensions for each collector. See argument -T
# for nfcapd(1) for more detailes.
# defaults to empty -> compatible to nfdump-1.5.8
# $EXTENSIONS = '';
# Example:
# $EXTENSIONS = 'all';
# $EXTENSIONS = '+3,+4';
#
# Directory sub hierarchy layout:
# Possible layouts:
#
# 0 default no hierachy levels - flat layout - compatible with pre NfSen versions
# 1 %Y/%m/%d year/month/day
# 2 %Y/%m/%d/%H year/month/day/hour
# 3 %Y/%W/%u year/week_of_year/day_of_week
# 4 %Y/%W/%u/%H year/week_of_year/day_of_week/hour
# 5 %Y/%j year/day-of-year
# 6 %Y/%j/%H year/day-of-year/hour
# 7 %Y-%m-%d year-month-day
# 8 %Y-%m-%d/%H year-month-day/hour
$SUBDIRLAYOUT = 7;
# Compress flows while collecting 0 or 1
$ZIPcollected = 1;
# Compress flows in profiles 0 or 1
$ZIPprofiles = 1;
# number of nfprofile processes to spawn during the profiling phase
# depends on how busy your system is and how many CPUs you have
# on very busy systems increase it to a higher value
$PROFILERS = 3;
# if the PROFILEDATADIR is filled up to this percentage, a warning message will be printed.
# set to 0 to disable the test
$DISKLIMIT = 98;
# number of nfprofile processes to spawn during the profiling phase
$PROFILERS = 6;
# Netflow sources
# Define an ident string, port and colour per netflow source
#
# Required parameters:
# ident identifies this netflow source. e.g. the router name,
# Upstream provider name etc.
# port nfcapd listens on this port for netflow data for this source
# set port to '0' if you do not want a collector to be started
# col colour in nfsen graphs for this source
#
# Optional parameters
# type Collector type needed for this source. Can be 'netflow' or 'sflow'. Default is netflow
# optarg Optional args to the collector at startup
#
# Syntax:
# 'ident' => { 'port' => '', 'col' => '', 'type' => '' }
# Ident strings must be 1 to 19 characters long only, containing characters [a-zA-Z0-9_].
%sources = (
'vyatta-vpn' => { 'port' => '9995', 'col' => '#ff0000', 'type' => 'netflow' },
'vyatta' => { 'port' => '9997', 'col' => '#0000ff', 'type' => 'netflow' },
);
#
# Low water mark: When expiring files, delete files until
# size = $low_water % of max_size
# typically 90
$low_water = 90;
#
# syslog facility for periodic jobs
# nfsen uses level 'debug', 'info', 'warning' and 'err'
# Note: nfsen is very chatty for level 'debug' and 'info'
# For normal operation, you may set the logging level in syslog.conf
# to warning or error unless you want to debug NfSen
$syslog_facility = 'local3';
#
# SYSLOG mess
# Log socket type: Most *NIX such as LINUX and *BSD are fine with 'unix'
# which is the default. You need to change that to 'stream' or 'inet' for
# some Solaris version 8/9, AIX and others ..
# You may set it to undef to prevent calling Sys::Syslog::setlogsock at all
# ( works for Solaris 10 and newer Sys::Syslog module
#
# If not defined at all, 'unix' is assumed unless for Solaris, which defaults to 'stream'
# $LogSocket = 'unix';
#
# Plugins
# Plugins extend NfSen for the purpose of:
# Periodic data processing, alerting-condition and alerting-action
# For data processing a plugin may run for any profile or for a specific profile only.
# Syntax: [ 'profile list', 'module' ]
# profile list: ',' separated list of profiles ( 'profilegroup/profilename' ),
# or '*' for any profile, '!' for no profile
# module: Perl Module name, equal to plugin name
# The profile list '!' make sense for plugins, which only provide alerting functions
#
# The module follows the standard Perl module conventions, with at least one
# function: Init(). See demoplugin.pm for a simple template.
#
# A file with the same name in the FRONTEND_PLUGINDIR and .php extension is automatically
# recongized as frontend plugin.
#
# Plugins are installed under
# $BACKEND_PLUGINDIR and $FRONTEND_PLUGINDIR
@plugins = (
# profile # module
# [ '*', 'demoplugin' ],
);
%PluginConf = (
# For plugin demoplugin
demoplugin => {
# scalar
param2 => 42,
# hash
param1 => { 'key' => 'value' },
},
# for plugin otherplugin
otherplugin => [
# array
'mary had a little lamb'
],
);
#
# Alert module: email alerting:
# Use this from address
$MAIL_FROM = 'your@from.example.net';
# Use this SMTP server
$SMTP_SERVER = 'localhost';
# Use this email body:
# You may have multiple lines of text.
# Var substitution:
# @alert@ replaced by alert name
# @timeslot@ replaced by timeslot alert triggered
$MAIL_BODY = q{
Alert '@alert@' triggered at timeslot @timeslot@
};
######################################################
#
# For the NfSen simulator include the section below.
#
######################################################
#
# Nfsen Simulator
# The simulator requires, that you have already installed
# and configured NfSen. The simulation is based on already
# pre-colleted data, which you may get from another live
# NfSen system.
#
# Steps to setup the NfSen simulator:
# 1. Configure the sources of the live profile with the
# same names of the NfSen system, you take netflow data
# for the simulation. Set the port for each netflow source
# to 0 to prevent a collector to be started.
# Install NfSen with this config in a seperate directory
# 2. Copy the pre-collected data into the appropriate
# netflow directory of the live profile.
# 3. Configure the simulator using the parameters below
# Enable Simulation mode => $SIMmode = 1
# Configure the time window of the pre-collected data.
# tstart => Start of time window. yyyymmddhhmm
# tbegin => Optional parameter. Start of simulation
# profile exists already between tstart - tbegin
# tend => End of time window. yyyymmddhhmm
# cycletime => simulation time in seconds of a 5min slot
# Setting cycletime = 0 processes the cycles as fast as
# possible. Please note, if you test plugings, your
# cycletime needs to be at least the time required to
# process all plugins.
# 4. Start nfsen: ../nfsen start
# Simulation starts
#
# The simulator runs from tstart to tend and stops when tend
# is reached. You may stop the simulation at any given time
# using ./nfsen stop. To continue the simulation start NfSen
# again: ./nfsen start. You may reset the simulator at any
# given time using ./nfsen abort-reset. This stops the sumulation
# and rolls back to tstart. All profiles/alerts are deleted,
# so you may start from scratch again.
#
# Configure simulator parameters
#
# $SIMmode = 1;
# %sim = (
# 'tstart' => '200707100000', # Simulation data available from July 10th 2007 00:00
# 'tbegin' => '200707110000', # Simulation begins at July 11th 2007 00:00
# 'tend' => '200707112355', # Simulation ends at July 11th 2007 23:55
# 'cycletime' => '30', # 30s per 5min slot
# ); А формат папок nfsen с сайта для тех кому важно что-где лежит:дальше интереснее.
У меня начались сразу проблемы ))
RRDtool у меня был 1.4, с которым nfsen 1.3.3 не работает. Идём
libexec/NfSenRRD.pm и правим строку
( $rrd_version >= 1.2 && $rrd_version < 1.3 )
на
( $rrd_version >= 1.2 && $rrd_version < 1.5 )
Все вроди как OK далаем:sudo ./install.pl /etc/nfsen/nfsen.conf
ан нет, не все гладко. Далее из переписки следовало, что надо заменить в install.pl все
make_path
наmkpath
и закомментировать строку:CopyRecursive::dircopy("doc", "$NfConf::INSTPREFIX$NfConf::DOCDIR");
далаем: sudo ./install.pl /etc/nfsen/nfsen.conf
cd /usr/local/nfsen/bin
sudo ./nfsen start
Все должно пройти нормально, идём наhttp://ваш.сервер.com/nfsen/nfsen.php
А дальше у кого как...У кого все в порядке, а у кого нет, потому что у некоторых стоит php5.2, а у некоторых
5.3. Для последних к коим я отношусь так же надо поколдовать дальше.
В папке web лица - /var/www/nfsen есть файлик nfsenutil.php.
В нём меняем
split
на preg_split
и в скобках вместо ' '
'/ /'
Тоже самое в rrdgraph.php там же.И теперь все должно получиться. Смотрим и радуемся.
Здесь можно посмотреть nfsen во всей красе!
http://nfsen.its.monash.edu/nfsen/nfsen.php
понедельник, 28 июня 2010 г.
Dr.Web uninstall
Как оказалось удалить такой антивирус как Dr.Web не так просто, точнее может быть и просто но мне пришлось повозиться и полазить по инету. Так вот официальные утилиты по зачистке компа от этого красавца сделанные самим производителем:
ftp://ftp.drweb.com/pub/drweb/tools/
Качаем и удаляем!
ftp://ftp.drweb.com/pub/drweb/tools/
Качаем и удаляем!
puTTY Connection Manager
Решил тут сократить количество программ которое я не покупал )).
заменил свой ssh клиент на puTTY Connection Manager ver. 0.7.1 BETA (bild 136), довольно неплохая утилита.
Но только одно но, если не поставить галочку Tools -> Options -> Show tray icon.

то постоянно вылетает с ошибкой. Так что рекомендую не снимать эту галочку как минимум до следующего релиза.
заменил свой ssh клиент на puTTY Connection Manager ver. 0.7.1 BETA (bild 136), довольно неплохая утилита.
Но только одно но, если не поставить галочку Tools -> Options -> Show tray icon.

то постоянно вылетает с ошибкой. Так что рекомендую не снимать эту галочку как минимум до следующего релиза.
понедельник, 15 февраля 2010 г.
Train Tula-Moscow Old
Снова проблема!
Она конечно не такая уж страшная, как проблемы в области IT, но для меня оказалась довольно таки внушительной.
Я иногда езжу на выходные с семьёй (я, супруга и дочка) на побывку в Тулу. Проблем с поездкой в саму Тулу не вызывает вопросов, экспресс который ходит по вечерам №809Ч, удобный красивый с парными местами.
Но дело тут вот в чём - в нумерации мест! Так как я покупаю, в основном, билеты через интернет, это удобно и дешевле! Так вот номера мест в экспрессе №809Ч (в котором только второй класс) идёт нормально, сначала номера по порядку с одной стороны, потом по порядку с другой. Так что занятие своих мест не вызывает никаких проблем.
Всё меняется когда приходят они!!!)))))))
А точнее время возвращаться домой, в воскресенье вечером, самый удобный путь это Экспресс №846Э Черь - Москва, с тремя классами вагонов (первый второй и третий соответственно). Ездим в основном или в первом или во втором классе. Третий это просто мягкие лавки - зимой очень не удобно, большие куртки и все такое не позволяют вообще разместиться на своём месте.
Ну так про нумерацию! Она не поддаётся никакой логике, точнее она есть конечно, но для продажи билетов и их покупки она не подходит вообще никак!
Сначала про первый класс!
Места расположены по 2, лицом друг к другу со столиком посередине. Нумерация ниже.
За точность номеров располагающихся у окна я не берусь, моя задача описать идею вообщем.
Вагон №1


(отмечу довольно таки интересные места на двоих со столиками 39-42)
Вагон №2
Вагон №3
Вагон №4
Вагон №5
Вагон №6
Вагон №7
Вагон №8

Картинки других вагонов буду добавлять по мере проезда или общения с теми кто ездил.
Уже не буду, так как этот поезд отменили. И теперь купить билеты на скоростной экспресс ТУЛА-МОСКВА и МОСКВА-ТУЛА соответственно можно только в кассах дальнего следования. Об этом будет отдельный пост.
понедельник, 8 февраля 2010 г.
Maps in Zabbix 1.8
Как всегда в такого рода делах, лучшее враг хорошего! Обновление из пакетов непрошло даром. ))
Ну ничего.
После того как я обновил Zabbix до 1.8 случилась проблема с картами (MAPS). Точнее после нажатия на кнопку добавления элемента получал тишину.
Залез в логии apache2 и нашёл ошибку:
[Mon Feb 08 13:41:39 2010] [error] [client 192.168.0.чч] File does not exist: /usr/share/zabbix/js/effects.js, referer: http://monserver.xxx.xx/zabbix/sysmap.php?sysmapid=2&sid=cffeb4533bfdf83a
[Mon Feb 08 13:41:39 2010] [error] [client 192.168.0.чч] File does not exist: /usr/share/zabbix/js/dragdrop.js, referer:http://monserver.aksi.com/zabbix/sysmap.php?sysmapid=2&sid=cffeb4533bfdf83a
Ну соответственно выход нашёлся сам собой. Скачал исходники с сайта zabbix.com распаковал и скопировал из
home/Distrib/zabbix-1.8.1/zabbix-1.8.1/frontends/php/js/scriptaculous
в
/usr/share/zabbix/js
рестартанул сервис и вперёд!
четверг, 4 февраля 2010 г.
Zabbix agent for Windows
Решил добавить ссылку с ресурса где лежат уже готовые инсталяхи агентов для Windows платфор.
Для особо ленивых, к которым я себя отношу....
http://www.suiviperf.com/zabbix/
Для особо ленивых, к которым я себя отношу....
http://www.suiviperf.com/zabbix/
Подписаться на:
Сообщения (Atom)